Boost Speed of a Ghost Blog massively with proper Cloudflare CDN Cache for Free
This is a new version of the previous code I provided, here all the caching and bypassing logic will be handled by workers. So the procedure is much easier now.
In this post, we are going to explore how to improve the performance of a Ghost blog with Cloudflare cache in Cloudflare CDN and make the blog highly available and scalable with superior performance boost free of cost (up to a limit), and ghost member features still works. Along with that I have included some test results to back up my claim. On the note of free, yes you get 100,000 requests per day for free, and depending on your site structure, that translates to about 3,000 to 10,000 page views per day (your mileage may vary).
To achieve the same result In Bunny CDN read here. (Bunny offers better performance than Cloudflare Free tier). That setup is much easier.
We will use cloudflare workers to implement the cache rules and differentiate between logged in and logged out users. For logged out users all content will be static and only for logged in user we will serve dynamic content.
I have migrated my site to WordPress now, But here is the Ghost version of the Site, for you to test the functionality. And here is my migration experience.
Introduction
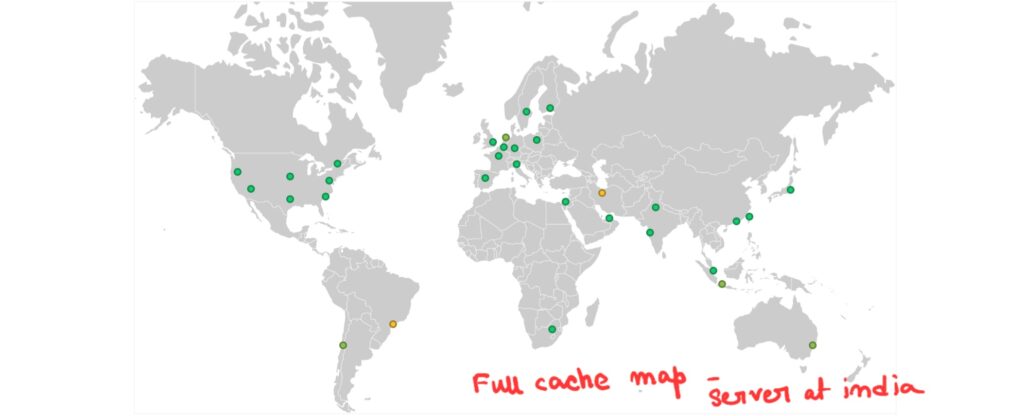
In this tutorial, I will guide you through the process of implementing a full-page cache, while ensuring cache bypass for logged-in users. For logged-out viewers, your ghost blog will behave like a static site and will load everything from a Cloudflare CDN’s edge server (more than 300 edge locations across the globe) completely bypassing your origin, but for logged-in users it will bypass the edge cache for dynamic contents. Additionally, we’ll share some compelling test results that demonstrate the impressive scalability of a self-hosted Ghost blog. (Spoiler alert: it can efficiently handle as many as 600k requests over 3 minutes without any noticeable impact on user experience.)
🤒 Only logged-in users will see the updated comments section, for logged-out users comment section will not update with new comments, until you purge the Cloudflare Cache. But you can automatically purged cloudflare cache after any changes. To do that view this blog post.
💡 If you use subscriptions or Google Adsense this should method should work perfectly. But I recently switched to Ezoic for ads, and you can’t cache between Ezoic and your user, so I don’t use it anymore. But this method overall perfectly works.
Superior Cloudflare Caching with Cloudflare Worker for Ghost blogs:
Now that we know what can be achieved with Cloudflare dashboard only, let’s implement the functionality I have been hyping about – Cloudflare Workers. Cloudflare gives around 100k free requests daily. If that is not enough their paid plan starts from 5 USD/month for 10 million requests. Let’s deploy the worker, but first, make sure you have applied the ‘URI to bypass’ cache rule in your dashboard.
Objectives:
- Caching everything for logged-out users
- Caching only static assets for logged-in users
Steps Involved:
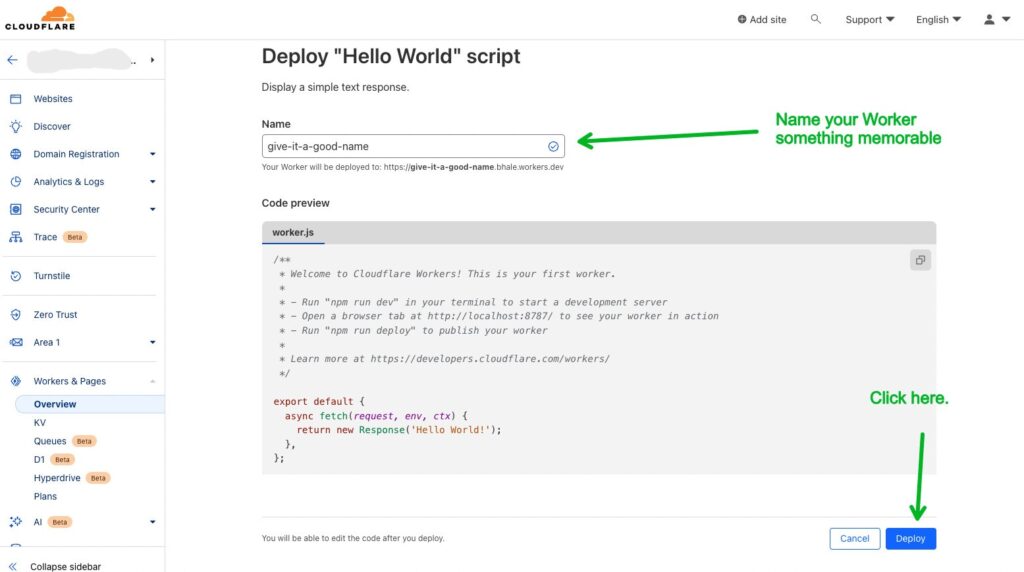
- Create a Cloudflare worker: To create a Cloudflare Worker, Visit Cloudflare dashboard > Workers and Pages > Create application > Create worker > Give it a name and deploy > Edit > Clear the existing index.js and paste the below script there > then Save and deploy. If you see any errors don’t worry, we need to add a route to these workers. we will check after that.
addEventListener('fetch', event => {
  event.respondWith(handleRequest(event.request, event));
});

async function handleRequest(request, event) {
  const url = new URL(request.url);
  const cookies = request.headers.get('Cookie') || '';
  const hasMembersCookie = cookies.includes('ghost-members-ssr=');
  const hasAdminCookie = cookies.includes('ghost-admin-api=');

  const isAdminPath = url.pathname.startsWith('/ghost/');
  const isPreviewPath = url.pathname.startsWith('/p/');
  const isSitemapXml = url.pathname === '/sitemap.xml';

  const isCacheable = url.pathname.endsWith('.css') ||
    url.pathname.endsWith('.js') ||
    url.pathname.match(/\.(png|jpg|jpeg|gif|svg|webp)$/i);

  if (hasMembersCookie || hasAdminCookie) {
    if (isAdminPath || isPreviewPath || isSitemapXml || !isCacheable) {
      return fetch(request);
    }

    const cache = caches.default;
    let response = await cache.match(request);

    if (!response) {
      response = await fetch(request, { cf: { cacheTtl: 1209600, cacheEverything: false } });
      event.waitUntil(cache.put(request, response.clone()));
    }

    return response;
  }

  if (isAdminPath || isPreviewPath || isSitemapXml) {
    return fetch(request);
  }

  if (request.method === 'POST') {
    return fetch(request);
  }

  const cache = caches.default;
  let response = await cache.match(request);

  if (!response) {
    response = await fetch(request, { cf: { cacheTtl: 1209600, cacheEverything: true } });
    event.waitUntil(cache.put(request, response.clone()));
  }

  return response;
}
With this worker, we are checking for a cookie used for user login in Ghost and managing traffic accordingly.
💡 don’t forget to change the URLs in the codes.
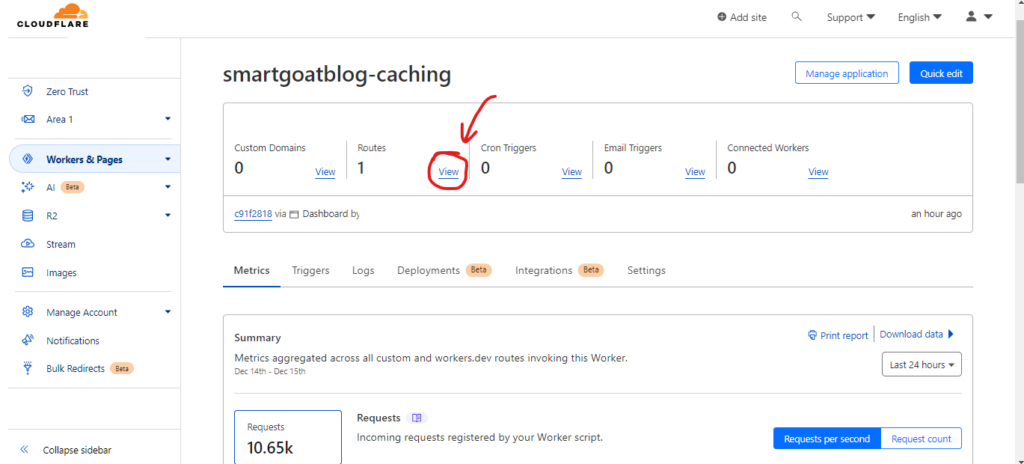
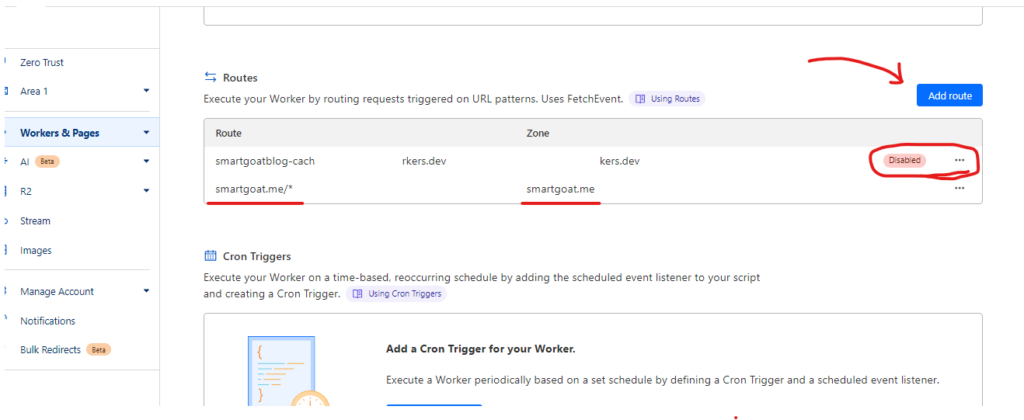
- Add a Route to this Worker: Now you need to create a route to your worker so that all requests coming to your site go through this worker. After Saving and Deploy you will see an overview page for your worker where you will find the routes ‘view’ option. Go there and follow the below images to add a route. This is what I use for this blog. And that will be all.
- For any queries visit this discussion forum.
💡 You might need to disable the rocket loader and auto-minify, if you face any issues with some parts of the site. ( Disabling Minify and rocket-loader won’t hurt your performance )
☝️ While on the route page, go to ‘request-limit-failure’ and set it to Fail open. So that if workers limit is exhausted it does not block traffic to your site.
Achieve the same result with Bunny CDN much easily here.
Benefits of Cloudflare CDN and caching: Better TTFB better load handling
(Test data provided as evidence)
Okay, so we have done all of that but for why, and exactly how beneficial it is? Let’s discuss with some real-world test data.
The tests conducted are:
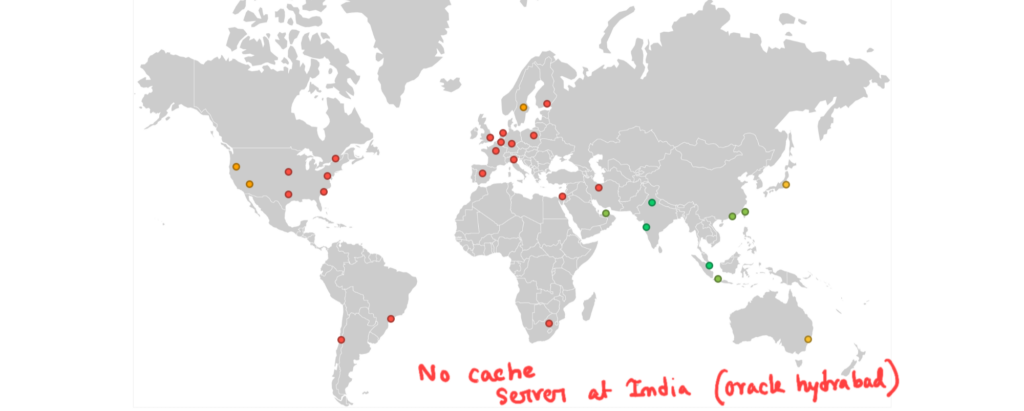
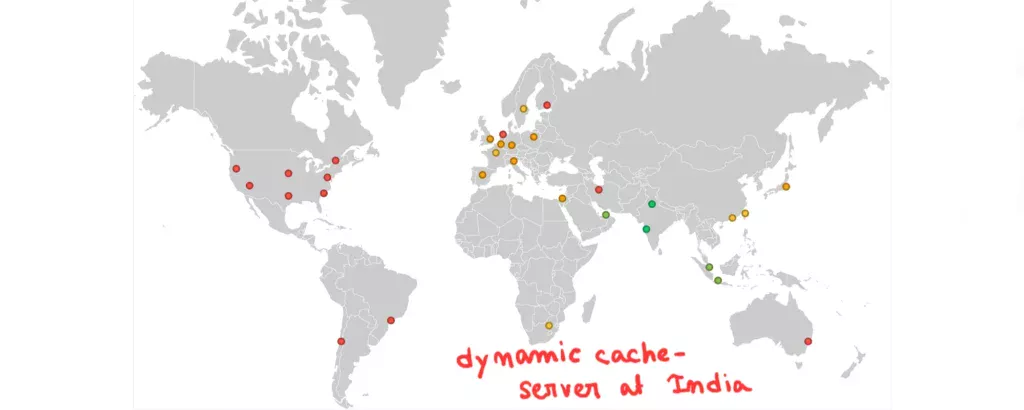
- Global TTFB checking using KeyCDN (10 locations) and SpeedVitals (more than 30 locations) tools.
- Load testing by simulating real-world visitors with 250 chromium Bots from 10 data centers to continuously visit different pages of my website. By Loadster tool.
Setups tested:
- Full-Cache: Blog: with full cache (what we deployed here)
- No-Cache: Blog: bypassing all off Cloudflare ( No CDN at all )
- Dynamic Cache: Blog with dynamic cache (what can be done from the dashboard, i.e. caching all static content no dynamic content)
My server Configuration:
- Free Tier Oracle Cloud Ampere A1 Instance 2 CPU core 16 GB RAM, 50GB NVMe SSD, and 2 Gbps bandwidth.
- CloudPanel Dashboard for Server management
- Two Ghost Blogs running on the same server ( smartgoat.me and www.medblogs.org )
- On the home page, all images are served from the server itself as Ghost does not allow images from URLs in featured images.
- Images inside the post are serving from Gumlet Image CDN. ( It does not affect the Load test results and TTFB tests)
Results:
TTFB Test: (best results I got for each setup from multiple tests):
| Setup (SpeedVital Data) | TTFB (Avg from 30 Locations) | Performance Summary |
|---|---|---|
| Full Cache | 104 Ms | 96% |
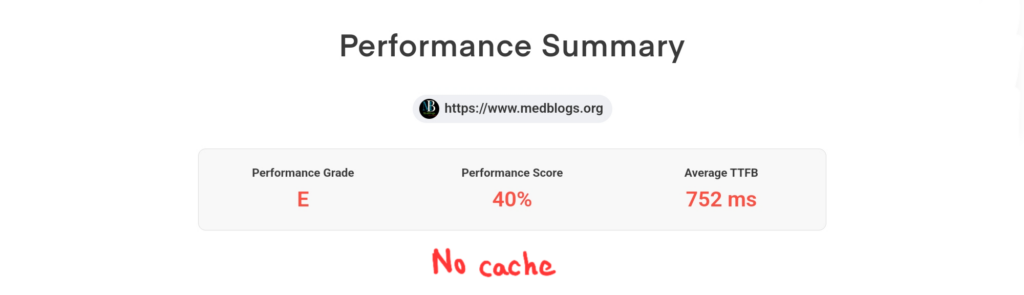
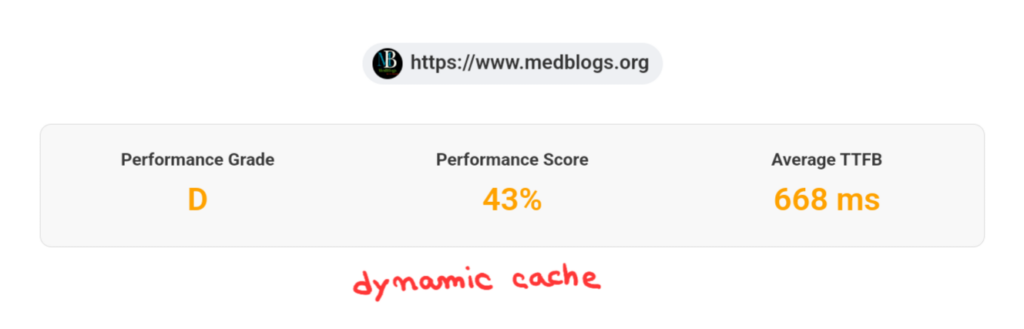
| Dynamic Cache | 668 Ms | 43% |
| No Cache | 752 Ms | 40% |
Images of test results are added Below
Load Test Results: (Loadster App)
I used 250 Chromium bots To literally ddos my site with thousands of requests per second simulating a real-world load of many users visiting my blog simultaneously (still a dream for me). Bots will gradually increase from 1 to 250 over 1 minute, then stay at 25O count for 1 minute and gradually decrease to 0 in the last 1 minute. In the process every bot will continuously load some pages of my site, I mostly used the home page https://smartgoat.me because I did not want to hit Gumlet CDN much to exhaust my free tier data. Anyway here is the result summary, and below link to every test given:
- Each test 3 minutes long ( with gradual Increase and gradual tapering )
| Setup | Request Served | Avg Response Time | Max Bandwidth | Data Downloaded |
|---|---|---|---|---|
| Full Cache | 613,530 | 0.747 S | 717 Mbps | 11.3 GB |
| Dynamic Cache | 79,308 | 11.33 S | 171.74 Mbps | 2.7 GB |
| No Cache | 63,163 | 17.26 S | 156.83 Mbps | 2.1 GB |
Test Links: For you to deep dive
- Full-Cache: Test Result here
- Dynamic Cache: Test Result Here
- No Cache: Test Result here
My Observations:
- Full cache massively decreased TTFB, which means faster loading time, better web vitals and better SEO.
- Even with huge requests coming through (600k over 3 minutes) it barely increased the site load time for any user. I visited the site during testing, only this time I didn’t even notice anything, all the other times there was huge loading time.
- It didn’t even touch my origin server. My CPU was chilling at 2-3% usage the whole time and RAM was at 11% which is baseline with no load. In the other 2 scenarios, CPU reached 45% and above and RAM never crossed 20% but still site was throttled
- It served overall more data, 12 GB at a max rate of 700 Mbps, the other 2 scenarios barely crossed 2 GB and 100 Mbps (my server bandwidth is 2Gbps). Basically, there were not enough bots and free-tier stuff for me to test.
- Bonus: Even when my origin server is down my site stayed up, because all the requests were getting served from Cloudflare CDN edge locations without even hitting my server. It works for logged out users only though.
Conclusion:
To conclude Cloudflare CDN with proper cache setup definitely improves the performance of a self-hosted ghost blog, and yes we can definitely self-host a highly scalable Ghost Blog. Hope you liked it, discuss any queries on our subreddit. Share if you find this post helpful. Here is how you can purge Cloudflare cache automatically when you publish a new post.