Easily Bypass CGNAT on any network and access self-hosted services from outside your house.
CGNAT is a major problem in self-hosting at home. All mobile and home broadband internet including starlink are using CGNAT now. You cannot access devices behind a CGNAT from outside internet directly. To bypass that we need to create a private VPN with all the devices you want to connect togather, so that they can be accessed from anywhere. And to do that the easiest method is using Tailscale.
Tailscale is based on WireGuard protocol and let you manage your own private VPN network from a dashboard connecting all your devices togather. So that you can access any device from one another on any network, i.e. you can access your home network from outside easily. But sometimes you want some of your services to be available on domain name. Like your Plex server or jellyfin you share with your friends and families or your on-prem NextCloud server with your employees. You can do that too with Tailscale and a VPS or Cloudflare Tunnel.
But CF has some drawbacks, especially for large files in media servers like Jellyfin, NextCloud, Plex, etc. They violate Cloudflare’s terms of service, and Cloudflare may terminate your account. To solve this issue we will build our Cloudflare tunnel alternative with Tailscale and Nginx Proxy Manager. It also comes up with better privacy as you don’t need to send your data through Cloudflare Network, better control, and better performance. The process is very easy.
Requirements
Note: If you don’t want that domain name part, just install tailscale on all of your devices. That will do the job. Tailscale has fantastic documentation for that. So I am not writing that. I am focusing on the domain name part here.
- Cloud VPS: First we need a free or cheap Cloud VPS that will be exposed to the internet and have a secure Wireguard tunnel to our homelab machines. It requires minimal hardware for personal usage. Look for VPS with a high bandwidth allowance Some cheap providers are:
- Oracle Cloud Free Tier (10 TB/month)
- Google Cloud Free Tier (200 GB/Month) [* use only if you have low bandwidth needs]
- Linode 5 dollars/month (1 TB) [ Although they continue to deny me access]
- DigitalOcean (referral link) 4 dollars/month (500GB) or 6 dollars/month (1TB)
- A free Tailscale account: Tailscale is a zero-config VPN service built on top of Wireguard. You need a tailscale account to begin with. The free tier comes with 100 devices and 3 users, which should be plenty. They operate the master server which assigns unique IP addresses to every device you have installed Tailscale on. You can reach every device from one another using their Tailscale IP address.

Initial setup
We are going to follow some simple steps to set up the server and the tunnel connection to our homelab. First, choose a VPS you are going to use. I am using a Oracle Cloud, because of the 10 TB free egress data.
Step 1: Install Tailscale in all the machines you are going to connect together.
It is recommended to install Tailscale directly on all the machines you want to connect. For our case, our homelab server may be the NAS, Raspberry Pi, or the PC, you get the idea. If you have multiple machines just install it on all of them. Also, install Tailscale on the cloud VPS. They have beautiful documentation on their website. It is very very easy.
Then visit the admin console. You will be able to see all your connected devices with their tailscale assigned IP addresses. These IP addresses are accessible only on your tailscale network, not from the internet. Check the connection between your homelab and your cloud VPS by pinging the machines from one another with their Tailscale IP addresses.
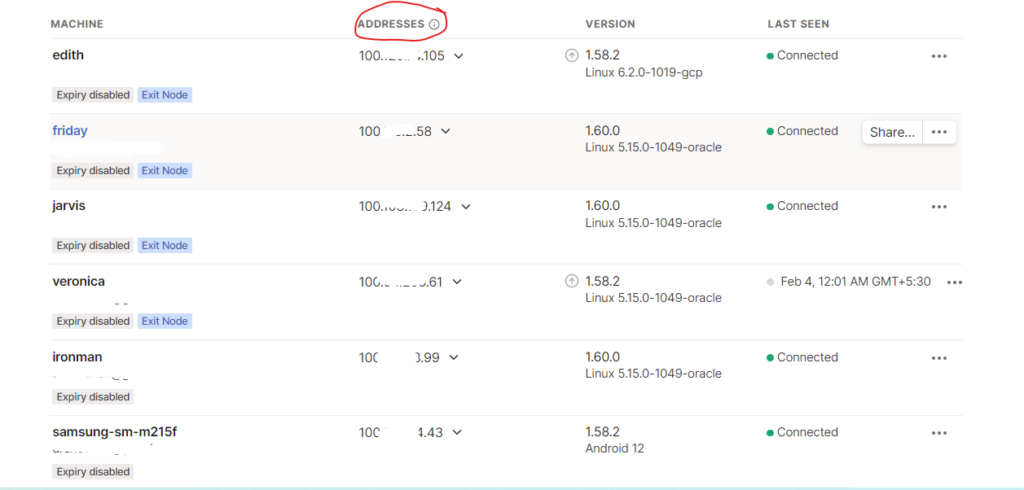
If you are successful then you have a working connection between your servers. Fun fact: You can even access your phone over a mobile network from your VPS and homelab.
On the VPS:
You need to open 3 ports on the VPS firewall, ports 80, 443, and 81
Step 2. Install Nginx Proxy Manager
Now that the tunnel is up and running, we need to serve the services on different domains to be accessible on the internet. So you have to proxy the traffic from the internet through your VPS and send it to your homelab. Let’s do that.
SSH into your cloud VPS and install docker and docker-compose > create a directory > and create a docker-compose file.
sudo apt update && sudo apt upgrade -ysudo apt install docker.io -ysudo apt install docker-compose -ysudo mkdir nginx-proxy-managercd nginx-proxy-managersudo nano docker-compose.ymlNow paste the latest docker-compose file from the nginx proxy manager Github page
version: '3.8'
services:
  app:
    image: 'jc21/nginx-proxy-manager:latest'
    restart: unless-stopped
    ports:
      - '80:80'
      - '81:81'
      - '443:443'
    volumes:
      - ./data:/data
      - ./letsencrypt:/etc/letsencrypt
Now save and exit the nano editor.
Now start the docker containers
sudo docker-compose up -dCheck if you can access your proxy manager at http://your-vps-public-ip:81
Login with the default user id: [email protected] and password: changeme .
If you are available to do that your initial setup is ready to go.
Final setup (exposing your services)
Now that your tunnel is ready, let’s expose the self-hosted services
Step 3: Setup DNS record
Go to your DNS provider i.e. from where you have brought the domain or Cloudflare if you are already using Cloudflare for domain management. Create DNS records for the individual services. For example, let’s expose Jellyfin. Create a DNS record like jellyfin.yourdomain.com and assign the VPS public IP address. Do not turn on the orange cloud in Cloudflare, as we are trying to avoid the thing in the first place as it violates Cloudflare terms and conditions.
Step 4: Setup Reverse Proxy with Nginx Proxy Manager
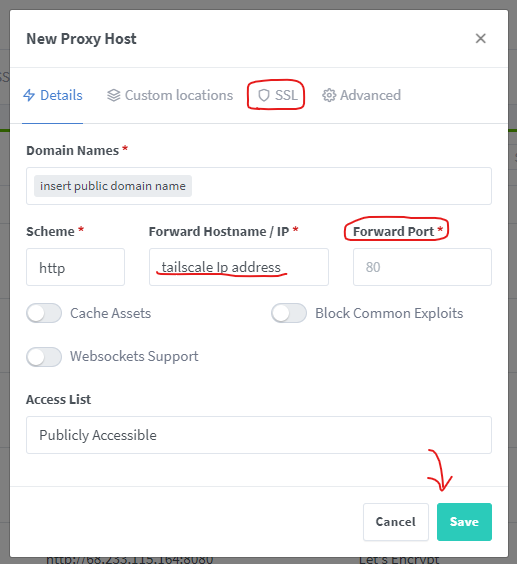
Go to the proxy manager admin page and add a reverse proxy. Insert the subdomain you just created at the DNS provider. At the place of the IP address put your tailscale IP of the homelab machine that is running Jellyfin (or the service you are trying to expose to the internet), and at port put the port you are running Jellyfin on (usually 8096) [ or the service you want to expose]. Go to the SSL tab and issue a let’s encrypt certificate and bam, you just exposed a service on your homelab to the internet without Cloudflare tunnel.
Now if you are exposing services that don’t involve a lot of traffic or are webpages you can turn on Cloudflare proxy (orange cloud), but do not turn on Cloudflare proxy for large media like Jellyfin, Plex, Emby, Nextcloud, or other file sharing stuff. Also if you don’t need to access something publicly, but need to access it on your personal devices, you can directly use the Tailscale IP and you are good to go.
Conclusion
This is a very effective and easy way to create a Cloudflare Tunnel alternative, but this time you are not bound by Cloudflare’s terms of service. Also, you don’t need to send your data through Cloudflare’s network. If you don’t want to use a tailscale account you can do that with headscale, but that adds a lot of complexity. Also, your data does not go through tailscale here, your machines are connected directly. Hopefully, I have explained the steps properly. Thanks for reading The SmartGoat Blog. And if you found this post helpful please share it. Also if you decide to use Digitalocean you will get some free credits here.