Build Your Own Serverless TodoList With Login And Email Notification for free with Cloudflare Worker
Hi from The SmartGoat Blog. Welcome to a ‘just another todo list blog’ to learn about ‘just another todo list application’. At this point, you have almost a million to-do list apps to try out and self-host. But every single to-do app is special because of its intended use, and customization as per need.
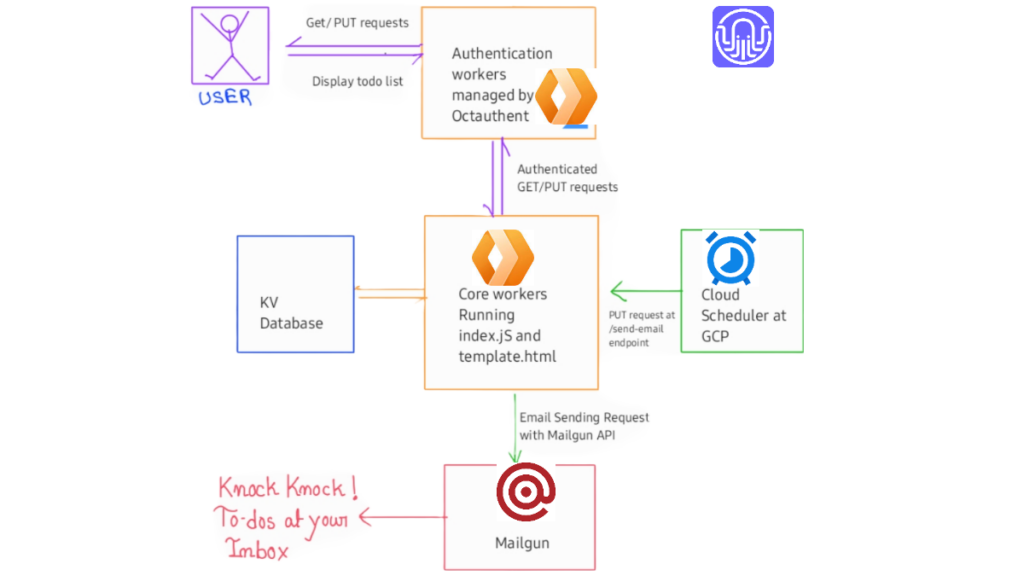
In today’s post, we are going to deploy just another to-do list using just another fancy technique called serverless functions. Our code will run at the edge of the world at over 300 servers along with the database which is also edgy. Today we will be using mainly Cloudflare Workers and Cloudflare KV. Also it will have user authentication and email notification.
We will be able to add a login screen, and we will also add a function to send you an email with the todo lists whenever you want. And you need to write about 5-6 lines of code for customization. So without further waiting let’s jump right in.
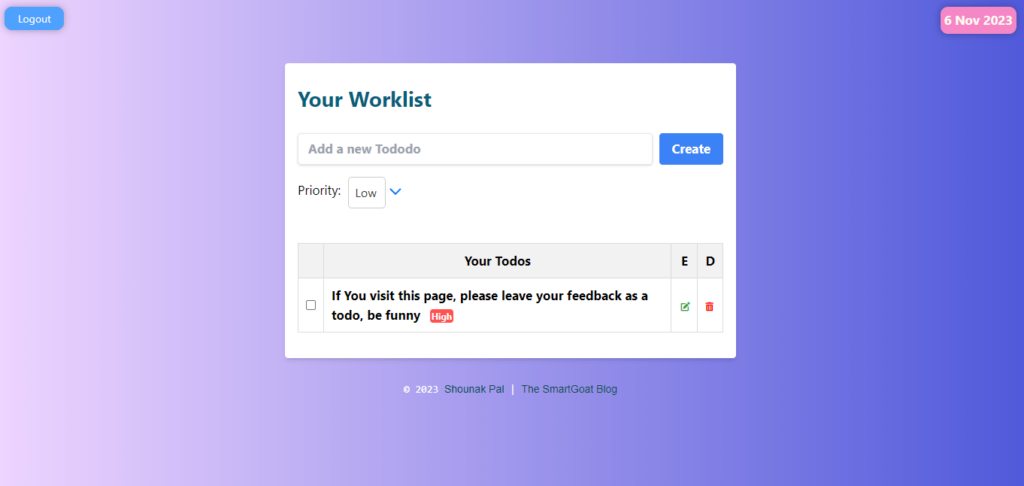
Here is a demo of the todolist:
This is what the final product will look like
- Website: Demo To-do list
- UserID : demouser
- Password: demopassword
Before starting a quick disclaimer this method will work for a personal or a shared among a team situation. It doesn’t have user signup or multi-user functionality. I will provide all the required codes below. You just need to copy and paste them. Everything in this process will be free, except the domain name.
Elaborate Intro
Technologies used:
Technologies used in deploying the to-do list are-
Here is an illustration of how all of them will come into play –
Requirements:
Before starting make sure you have these things ready with you. If you don’t need email you may leave points 4 & 5
- A Domain Name Get One here
- Cloudflare Account
- Octauthent Account
- Mailgun Account
- Google account (for GCP)
Functionality:
This to-do list app will have the following functionality –
- We will store KV data against the domain name, so having a domain name is necessary. Use different subdomains for different lists.
- There will be the usual Create todo, Edit todo, Delete todo functionality.
- Additionally a priority tag is added.
- User authentication for protecting your to-do list.
- Email sending functionality with the to-do list.
Here are some screenshots of the user interface –
Okay, enough chit-chat, now let’s build the real thing-
The process of building the serverless todolist
Go to CloudFlare and Deploy the To-do list app:
- If you are new to CloudFlare, Create a CloudFlare account and add your domain to CloudFlare. Here is a how to for that.
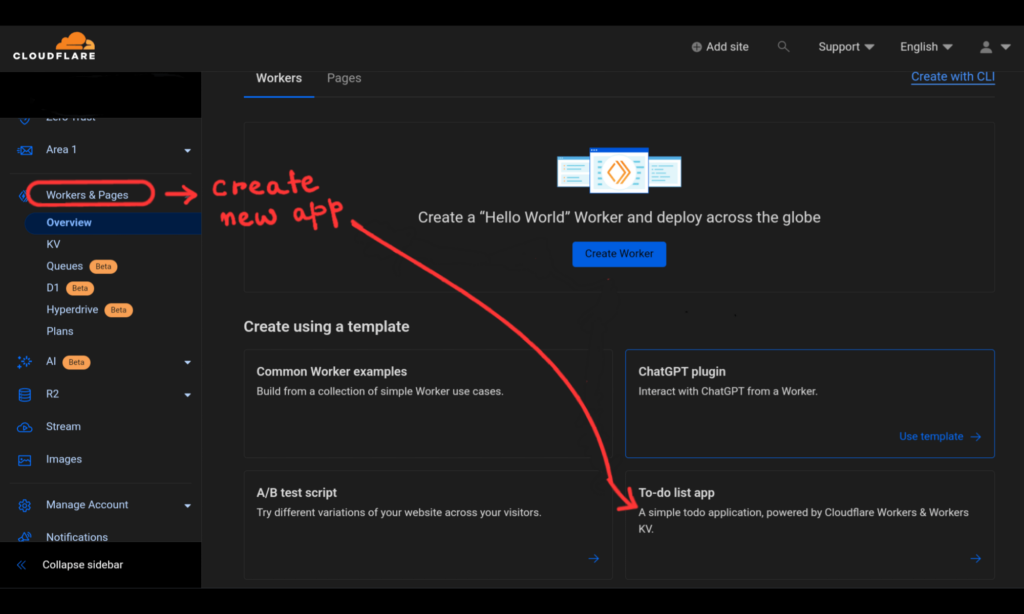
- In the Cloudflare Dashbord Go to Workers & Pages section, and Create application.
- Under Create application. go to TO-do list app.
- Give it a funny fancy name
- Hit deploy.
Voala! You have a basic simple todolist app running at your workers.dev subdomain. This is a template todolist from CloudFlare. It is using IP adress to store your todo datas. So lets modify it to make it better.
Modify the Todo list app code for increased functionality:
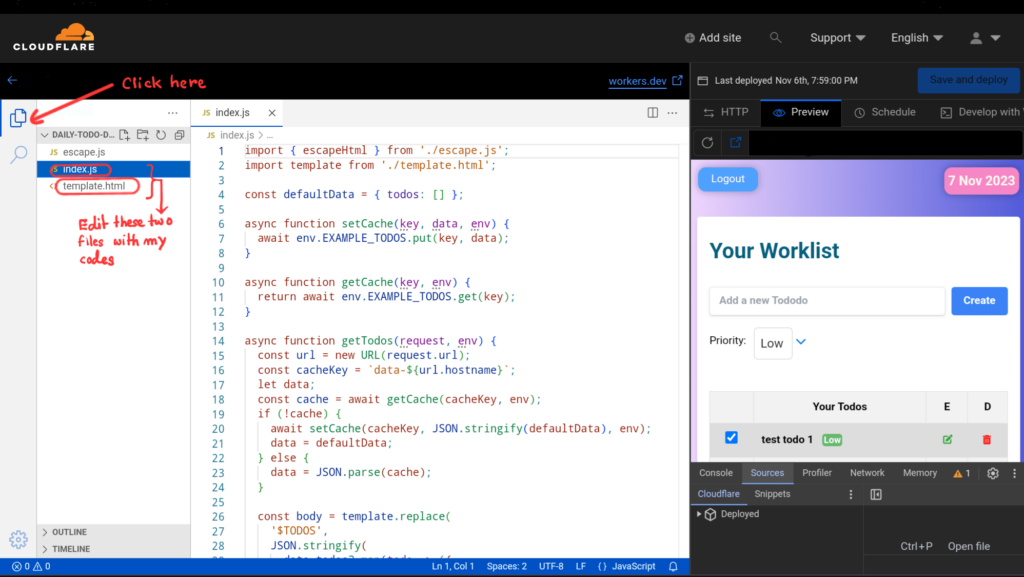
- Go to edit code / quick edit
- You will face something like this in front of you. Follow the below image for better understanding.
- Copy the index.js and template.html file from this GitHub Repository
- Hit deploy. Done. Your to-do list is up and running.
Till Now:
- Your To-do list have Adding and Editing Functionality.
- It is storing the todos against the domain name used. So you can access the todos from any device. For multiple todos use different subdomains to differentiate.
- There is no authentication yet.
- Email is not configured yet.
- Confirm delete by entering ‘smartgoat’ this is the default secret code for deletion.
Lets Understand The Code and Learn The required Modifications:
You can just copy and paste this codes form the GitHub repository. You just need to put some values in 3-4 places. That’s it.
Index.js:
This part of the code handles the to-do functions, Nothing to change here.
import { escapeHtml } from './escape.js';
import template from './template.html';

const defaultData = { todos: [] };

async function setCache(key, data, env) {
  await env.EXAMPLE_TODOS.put(key, data);
}

.....
......

    await setCache(cacheKey, body, env);
    return new Response(body, { status: 200 });
  } catch (err) {
    return new Response(err, { status: 500 });
  }
}
This part handles the Table generation while sending you the email. Nothing to change here too, unless you absolutely want to.
function createHtmlTableFromJson(jsonData) {
  const now = new Date();
  const istTime = new Date(now.toLocaleString('en-IN', { timeZone: 'Asia/Kolkata' }));
  const dateTimeString = `<div style="text-align: center; font-weight: bold; color: #5386ed; font-size: 20px; margin-bottom: 20px;">🕒 Sent at: ${istTime.toLocaleString()}</div>`;

  let table = `<table style="width:100%; border:1px solid black; border-collapse: collapse; font-size: 16px;">
  <thead style="background-color: #d3d3d3; color: black;">
    <tr>
      <th style="padding: 15px; border: 1px solid black;">ID</th>
      <th style="padding: 15px; border: 1px solid black;">Name</th>
      <th style="padding: 15px; border: 1px solid black;">Completed</th>
      <th style="padding: 15px; border: 1px solid black;">Priority</th>
    </tr>
  </thead>
  <tbody>`;

  jsonData.todos.forEach((todo, index) => {
    let rowColor = index % 2 === 0 ? '#f2f2f2' : '#ffffff';
    let completedColor = todo.completed ? 'green' : 'red';
    let priorityColor = '';
    if (todo.priority === 'high') {
      priorityColor = 'red';
    } else if (todo.priority === 'mid') {
      priorityColor = 'orange';
    } else {
      priorityColor = 'green';
    }

    table += `
    <tr style="background-color: ${rowColor};">
      <td style="padding: 15px; border: 1px solid black;">${escapeHtml(todo.id)}</td>
      <td style="padding: 15px; border: 1px solid black;">${escapeHtml(todo.name)}</td>
      <td style="padding: 15px; border: 1px solid black; color: ${completedColor};">${todo.completed ? 'Yes' : 'No'}</td>
      <td style="padding: 15px; border: 1px solid black; color: ${priorityColor};">${escapeHtml(todo.priority)}</td>
    </tr>`;
  });

  table += '</tbody></table>';
  return dateTimeString + table;
}
And This part handles the email sending function. You need to make some changes to this part of your code-
async function sendTodosByEmail(request, env) {
  const domain = new URL(request.url).hostname; // Get the domain from the request
  const cacheKey = `data-${domain}`;
  const data = await getCache(cacheKey, env);
  if (!data) {
    return new Response('No todos to send', { status: 404 });
  }

  // Convert the JSON data to HTML table
  const htmlTable = createHtmlTableFromJson(JSON.parse(data));

  const now = new Date();
  const istTime = new Date(now.toLocaleString('en-IN', { timeZone: 'Asia/Kolkata' }));

  // Format the date and time as a string
  const dateTimeString = istTime.toLocaleString();

  // Append the date and time to the data
  const dataWithDateTime = `${htmlTable}\n\nSent at: ${dateTimeString}`;

  const mailgunUrl = `https://api.mailgun.net/v3/YOUR_DOMAIN_NAME/messages`;
  const response = await fetch(mailgunUrl, {
    method: 'POST',
    headers: {
      'Content-Type': 'application/x-www-form-urlencoded',
      'Authorization': `Basic ${btoa('api:YOUR_MAILGUN_API_KEY')}`
    },
    body: new URLSearchParams({
      from: 'SENDER_EMAIL',
      to: 'RECIPIENT_EMAIL',
      html: dataWithDateTime, // use 'html' instead of 'text' to send HTML content
      subject: 'Your todos'
    })
  });

  if (!response.ok) {
    return new Response('Failed to send email', { status: 500 });
  }

  return new Response('Email sent successfully', { status: 200 });
}
Here You need to update the mailgun URL with your domain name, put your mailgun api, sender email and recipient email. I will write how to setup mailgun for free below. just keep in mind you need to change this part only.
And Below is our routing part. which tells our workers that run the To-do functions for all GET/POST requests. But if it gets a POST request at https://yourdomain/send-email it will trigger email sending part of the code. you don’t need to change it either.
async function handleRequest(request, env) {
  const url = new URL(request.url);
  if (request.method === 'POST' && url.pathname === '/send-email') {
    return sendTodosByEmail(request, env);
  } else if (request.method === 'GET') {
    return getTodos(request, env);
  } else if (request.method === 'PUT') {
    return updateTodos(request, env);
  } else {
    return new Response('Not found', { status: 404 });
  }
}

addEventListener('fetch', event => {
  event.respondWith(handleRequest(event.request, event))
});

export default {
  fetch: handleRequest
};
Lets talk a little bit about the template.html:
Currently I am using smartgoat as delete confirmation. It is just a shameless self-promotion trick. And using it makes no sense for you. So lets change it.
Somewhere inside the template.html you will find this set of lines in deleteTodo function, which handles todo deletion. Where you will find a big cryptographic number which is basically ‘smartgoat’ in SHA 256 encoded format. You need to change this. Go to this tool to generate the SHA 256 encoded format of your own funny secret code. If your secret code is ‘pass123’, then put that in this tool. You will get a code like below, just replace the existing one with your’s, and don’t use
FYI this is the encoded format : in var hashedCode =
 // Replace 'hashedCode' with the actual hashed secret code stored in your code
    var hashedCode = '961ba08fc5787c748d350402ce3c19caec3d2bc36015b09de9530a870d12a88f'; // Example hashed secret code to authorise delete USE_YOUR_OWN_CODE_HERE
And this is the part of the template.html where you will find it.
var deleteTodo = function (todoId) {
  var modal = document.getElementById('confirmationModal');
  var span = modal.querySelector('.close');
  var confirmBtn = document.getElementById('confirmDeleteBtn');
  var secretCodeInput = document.getElementById('secretCodeInput'); // Corrected the ID here

  modal.style.display = 'block';

  span.onclick = function () {
    modal.style.display = 'none';
  };

  confirmBtn.onclick = function () {
    var enteredCode = secretCodeInput.value;
    var hashedEnteredCode = CryptoJS.SHA256(enteredCode).toString(); // Hash the entered secret code

    // Replace 'hashedCode' with the actual hashed secret code stored in your code
    var hashedCode = '961ba08fc5787c748d350402ce3c19caec3d2bc36015b09de9530a870d12a88f'; // Example hashed secret code to authorise delete USE_YOUR_OWN_CODE_HERE

    if (hashedEnteredCode === hashedCode) {
      window.todos = window.todos.filter(todo => todo.id !== todoId);
      updateTodos();
      modal.style.display = 'none';
    } else {
      alert('Incorrect secret code. Todo not deleted.');
      modal.style.display = 'none';
    }
  };
};
That’s all the changes you need to do in the code of this To-do list for full functionality. Rest will be your own changes for personalizing.
Add Custom Domain to the workers:
- Go to your todo workers.
- You will find a custom domain view option.
- Go to custom domain and add the domain/ subdomain you want for your todo.
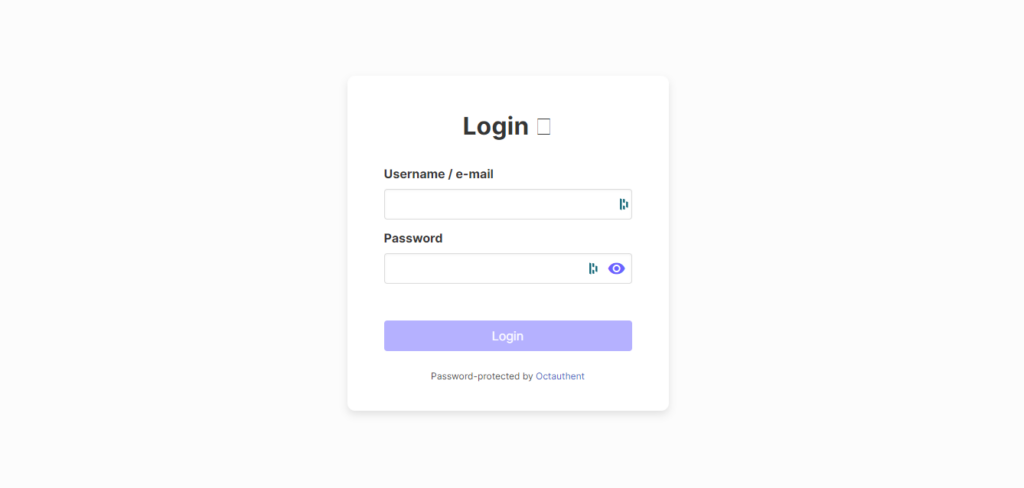
Lets Add Authentication:
We will be using Octauthent for user authentication. Remember, we are using domain name for storing the todos, so anyone with the authentication will see the same Todos, there is no user signup. This is for personal deployment, or deployment for a team who shares the same to-do list. For differentiation todo list use different subdomains. You can add multiple subdomains with the same workers. ( I am using 22 😅😑)
- Lets sign up for octauthent.
- And here is the official octauthent guide for how to setup. Follow this simple guide. You will be good to go.
And now you have Authentication for your to-do lists
Lets Add Email:
Now why email? Just for making your site fancy. We will set time, let’s say morning at 8 AM and night at 10 PM, we will receive an email with all the to-do lists, what is done, what is left, and their priority.
I am using Mailgun for sending the emails. Mailgun offers 1000 emails per month for free. You do need a credit card though. Now let’s set Mailgun.
- Signup for a mailgun account. Choose Foundation Trial. At this point, you will see there is no mention of a free plan. don’t worry. there is. It is just hidden.
- After signup hover over your profile and go to Plan & Billing. You will see the Foundation Trial. Beside the upgrade there is a button click it and unsubscribe. Then You will find the flex plan. (This is as of writing this post)
Flex Plan:
- 1,000 emails per month
- 5 days of log retention
- 24/7 ticket support
Now that you have prevented mailgun from taking your hard-earned money, let’s set Mailgun:
- Add your domain to Mailgun. Official guide
- Generate an API ( Go to API security > Api Keys > Add New Key )
- Replace this domain name and API key in the index.js as stated earlier.
- Also put email IDs there.
Now check whether the email delivery is working or not.
Open your command prompt or terminal on your device
curl -X POST-https://your-custom-todo-domain/send-email
Let’s Automate Email Delivery:
- Go to Google Cloud Scheduler
- Create a Google Cloud account if you are new to GCP.
- Go to your console
- Select Create Job
- Give it a funny name
- Select a region nearest to you
- In the frequency tab Put the frequency using this documentation. Best approach is to ask Google Bard or ChatGpT. You can also use our own chatbot Chatty,
- Set your time zone
- Target Type: HTTP
- Url: https://your-todo-list-url/send-email. Don’t forget the /send-email part.
- HTTP Method: POST
- create
- Go to the hamburger menu in your job scheduler list below Action
- Force Run to check if everything works.
Conclusion:
Now you have successfully deployed your own serverless to-do list app. Play with it, add functionality, and make it beautiful. Hopefully, You have not faced any roadblocks along the tutorial. Other than domain name nothing will cost you any money. If you don’t have a domain name, try getting one, at least one with country codes. It only costs 3-4 bucks a year. Avoid Godaddy for domains. Use Hostinger, Porkbun or CloudFlare registerer. Cloudflare 100,000 free workers every day. Which should be plenty. Login uses 1 worker and each function in your todo is another worker. In terms of KV you have 1,000 KV writes per day, so You can add or modify todos 1,000 times per day and a total 1 of GB of data(can store thousands of todos) storage Which should be plenty too. Your GCP scheduler is limited to 3 tasks and 1000 operations per task per month. And Mailgun offers 1000 emails per month for free. So hopefully this is going to be plenty for your use case.
Thanks for reading till the end. Enjoy reading The SmartGoat Blog.Subscribe to our occasional newsletter to get new posts as soon as they get published.