How to create PWA for a WIX Website Easily
Simple, Easy Guide to create a PWA for any Wix Website

Share At:
Hi, welcome to The TechWeirdo, in today's post, I am going to show you how can you create a Progressive Web App for your Wix website very easily. I previously published a much harder process at SmartGoat Blog, but this new process is much easier and faster to implement. And you can create any PWA functionality, like offline availability, making it installable, and others to name a few, all on your domain.
Btw, this guide not only works for Wix but will also work for any website including Wix, Webflow, Squarespace, WordPress, etc. PWA is not natively supported by Wix, but that does not mean we can't do it, we easily can with Cloudflare Worker.
What is being done here (Requirements for PWA)
To make any website a PWA, you need to serve two files, a manifest.json and a service-workers.js. and they should be served from your website URL. For example, let's say https://yoursite.com is your site URL. Then you need to serve a manifest.json file at https://yoursite.com/manifest.json and a service worker at https://yoursite.com/service-worker.js. You need to customize your manifest.json and service worker file as per your need.
How are we Doing it (The procedure)?
To do this, you need to add your site to Cloudflare. You have to proxy the site through Cloudflare as we will be using Cloudflare workers to serve those manifest and service worker files. If you are already using Cloudflare then that is great. Otherwise, add Cloudflare to your site. Here is an easy step-by-step guide to add your site to Cloudflare:
 Shounak Pal
How to add your website to Cloudflare Easily
Now that you have added your Cloudflare, let's do some magic with Cloudflare worker.
Adding manifest and Service-worker with the help of Cloudflare workers
Now, don't panic, it may sound complex but it is very easy, you just need to copy and paste things.
Cloudflare Worker is a serverless platform by Cloudflare that can do many things, but today, we will serve our two files, with it. Now before starting please remember, that Cloudflare worker's free tier is very generous giving you 100,000 requests per day for free, which amounts to 50,000 pageviews per day. If you have more traffic than 50,000 a day, you need to spend 5 USD/month. It's is very cheap.
What we are doing with Cloudflare worker.
We will have a worker code, that will listen to https://yoursite.com/manifest.json and https://yoursite.com/service-worker.js , and only when this URL matches, it will send the respective files. So we need a worker code and add paths as a trigger to it. Now this may sound unfamiliar to you. So I have created an easy guide about Cloudflare workers, with the exact amount of information you need.
Shounak Pal
How to Create a Cloudflare Worker
The Worker Script:
I hope now you are very familiar with Cloudflare and Cloudflare Worker. So here is an example code, I will break it down below.
// manifest.json
const manifest = JSON.stringify({
  name: 'Your Website Name',
  short_name: 'Your Short Name',
  start_url: '/',
  display: 'standalone',
  background_color: '#ffffff',
  theme_color: '#000000',
  icons: [
    {
      src: '/icon-192.png',
      sizes: '192x192',
      type: 'image/png',
    },
    {
      src: '/icon-512.png',
      sizes: '512x512',
      type: 'image/png',
    },
  ],
});

// service-worker.js
const serviceWorker = `
self.addEventListener('install', (event) => {
  event.waitUntil(
    caches.open('my-cache').then((cache) => {
      return cache.addAll([
        '/',
        '/index.html',
        '/style.css',
        '/app.js',
      ]);
    }),
  );
});

self.addEventListener('fetch', (event) => {
  event.respondWith(
    caches.match(event.request).then((response) => {
      return response || fetch(event.request);
    }),
  );
});
`;

addEventListener('fetch', (event) => {
  const { request } = event;
  const url = new URL(request.url);

  if (url.pathname === '/manifest.json') {
    event.respondWith(new Response(manifest, {
      headers: {
        'Content-Type': 'application/json',
      },
    }));
  } else if (url.pathname === '/service-worker.js') {
    event.respondWith(new Response(serviceWorker, {
      headers: {
        'Content-Type': 'text/javascript',
      },
    }));
  } else {
    event.respondWith(fetch(request));
  }
});
An Example Code. (You need to modify the manifest and service worker
The above code has three parts. The first part is the manifest file. You need to modify the manifest file as per your needs and preferences. Manifest controls the appearance of your PWA.
The Second part is the service worker code. With this service worker, you can add supported functionalities to your PWA. For example, in this case, the service worker caches some pages. But would recommend you to go through these guides, if you are new to PWA.
Resources Related To Service Workers (PWA):
- A beginner’s guide to Service Workers
- A Practical Guide To Service Workers
- Service Worker -By Web Dev
- PWA Guide by Mozilla
The third part of the code is the routing which serves the respective files, for their respective URLs.
Modify the code, as per your need, and deploy it according to the Cloudflare worker's Guide I gave you above. And follow that guide to add a trigger to your worker.
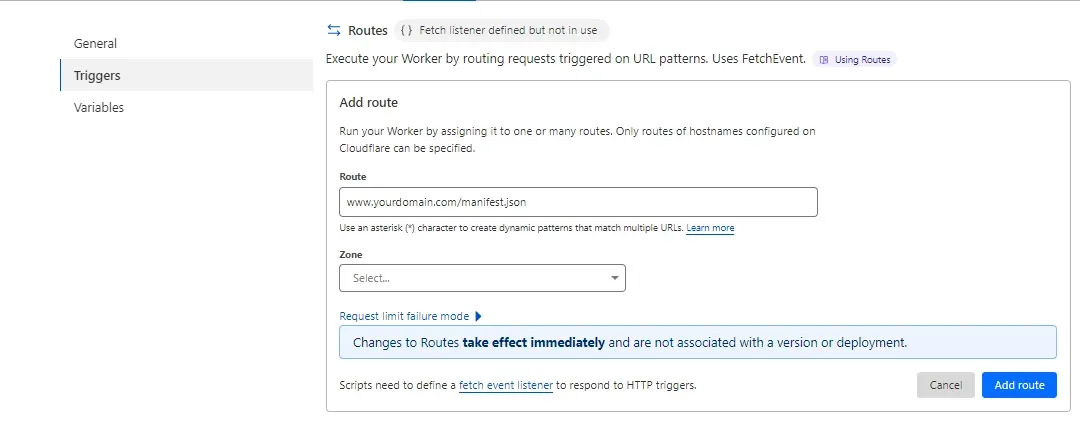
Add routes to your worker:
After deployment go to settings and add go to trigger > select add route and the two routes.
- www.yoursite.com/manifest.json
- www.yoursite.com/service-worker.js
Check whether it works or not
Now let's check whether the thing worked or not. Go to https://yoursite.com/manifest.json and https://yoursite.com/service-worker.js and check if the files actually appear.
Also keep in mind, that your site usually will have www in front of it but it may not. Just keep that in mind.
Putting codes in the Wix site header and Footer
Now you have put manifest.json and service-worker on your site, but the browser does not know that, so we simply add two lines of code, one at the header and another at the footer of your Wix site. Go to settings, scroll down, and under the advanced tab, you will find custom code. Here is an image and a link to the official wix documentation for you.


Wix Custom Code Embedding Guide
Code to be inserted at the Head
Copy this code:
<link rel="manifest" href="/manifest.json" />Then go to the 'add custom code' under code settings > Paste the code > Select the Domain > Apply to all pages > Load Once > Place code in head. Then under Code Type > set to 'Essential'.
Code to be inserted at the Page/Foot
Copy this code:
<script>
if ('serviceWorker' in navigator) {
  window.addEventListener('load', () => {
    navigator.serviceWorker
      .register('/service-worker.js')
      .then((registration) => {
        console.log('Service Worker registered:', registration);
      })
      .catch((error) => {
        console.error('Service Worker registration failed:', error);
      });
  });
}
</script>
Insert at Body-End
Follow the same process as above for the code insertion. Except this time place it in body-end.
And that completes your journey of creating a PWA for a Wix website.
Conclusion
In this guide, I tried my best to create a simplified guide to create a PWA for a Wix website, but this same process also works for Squarespace, Webflow, or any website you want. Only the process of adding the header code and the body code will be different for each platform. I hope the guide is easy to follow. Please let me know by commenting below, if you have any problems, or how can I improve the guide further. I am looking forward to your valuable opinion. Thanks for reading The TechWeirdo and have a nice day.